

Day 20: What’s the best survival knife…
Failing to prepare is... (preparing to fail)


My personal favorite survival knife…
I just put on a massive discount (see now above)
Knife characteristics, what to look for in a survival knife: Knife characteristics and what to look for in a survival knife is about as beat up a conversation as what is the ultimate bullet to use in a survival gun. Having said this there are what I will call some Universal truths. Some of these so-called Universal truths are born of experience not of my own but of others. If we can stand on the shoulders of giants why wouldn't we? However, let's give them credit when possible as they did the leg work in advance. One of my primary mentors/influencers are Morse Kohanski and David holiday. Both men have spent their entire lives dedicated to primitive living skills, wilderness survival, military instruction and just plain learning how to go out into the Wilderness and not need to come back, unless you want to. With that in mind, I will attempt to sum up Morris's knife requirements. He found out that you need a continuous curve in the blade so that it cuts with a draw cut not a press cut. It’s valuable to have a non-super pointy tip because it's going to bust off anyway with hard use. Your knife needs a Pummel on the bottom to crush things or to be used as a hammer. A robust not breakable knife has a Full Tang so that you can baton with the blade and not break it. Your knife needs an indestructible handle. There are other attributes to look for in knives just like there are other attributes to look for in vehicles or shoes but those attributes make them more suited for one task and less suited for another. One of the most do everything and therefore do nothing well knives I have ever played with is the Tom Brown tracker. It reminds me of a Subaru Baja. The Baja is not a car or a truck and therefore does neither car nor truck things well. A great alternative might be the Tops knives, brother of Bushcraft or BOB knives. If you can find one, a Skookum bush tool is about as perfect as they come. Simply put, all of the best design characteristics have already been created and had the bugs ironed out over thousands of years of use in places like the jungle or Lapland or the desert. If you take the design characteristics of knives like the laplander Puuco or Leuku and add modern-day construction techniques to them such as super steel and a Full Tang you get an ultimate survival knife. This can be said of the jungle parang or any of the Filipino or Indonesian jungle knives. This can also be said of the simple machete. If it was good enough for your ancestors and you improve on it with technology without changing design characteristics that gives you the Ultimate Survival blades.
Step By Step of what survival knife you need
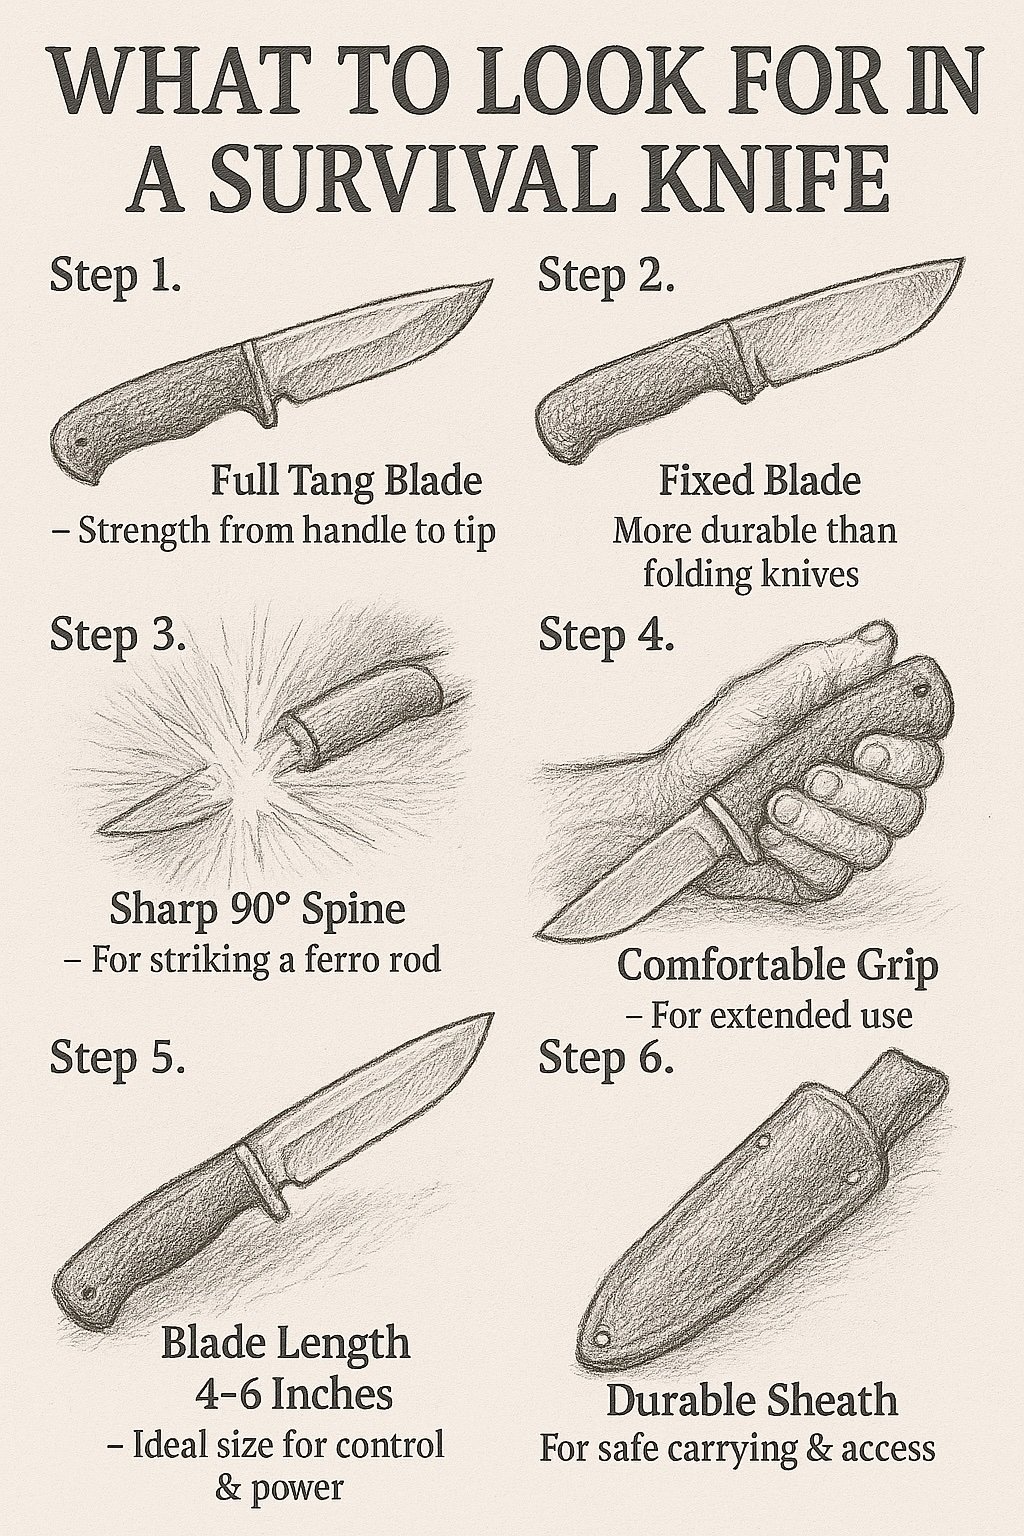
knife characteristics you need video intro…
Day 19: What gun you need in the wild…
Stay ready. Move smart.

Guns: Nothing seems to be more polarizing than the arguments over what is the best caliber, what is the best bug out gun, or what is the best gun for hunting. The more education I get in this realm the more I learn that it really doesn't matter if you know what you’re doing with the fire arm you have. Shot placement, and your ability to hit with your aiming is probably more important than anything else. Having said this there are a couple key factors that should be taken into consideration when buying a firearm for protection, SHTF, hunting, or whatever else you choose to use it for. If anything, my experience in the military has taught me you can never have enough ammunition. The problem with ammunition is that it is heavy and you need vehicles to pack it around and helicopters to bring you more when you run out. When it comes to survival I have spent a little bit of time looking into what the SERE instructors for the US Special Operations use. In doing so, I have had a lot of different answers. There is one answer however that I really like, and have replicated for myself. When it comes to survival which means hunting more than self-defense, having something extremely lightweight, extremely accurate and with a large round capacity that doesn't take up a lot of space or way too much is paramount. Because of this I like the .22 over most other rounds. I can carry 500 rounds in a small box, where I would need a full kit to carry 300 rounds of 5.56/.223. I use a Ruger Mark 4 with a Red Dot scope, suppressor and under mount Light on it as my primary back packing/survival gun. Either myself or friends of mine or instructors that I have mentioned earlier have taken down everything from large game, Rabbits, Birds, snakes, raccoons, deer, to whatever else you can imagine using that set up. I’ve fed myself countless times with wild rabbits and other critters using that setup. Basically stated if you can get within about 75 yards of something you can put quiet rounds on Target, and feed yourself quickly with a survival solution like this. This is why the .22 was the primary round used by downed pilots in Vietnam to fed themselves until they could be rescued. Self-defense however is all together another thing completely. Self-defense requires speed, and preferably long distance from the threat. The ability to retreat and reset is also paramount. The AR-15 excels here because the round is large enough to do the job weather the job is self defense or food procurement, and not so heavy that carrying 300 rounds becomes impossible. For big game taking at distance, we move into something like the 308 or 300 Win Mag so that we can make those 800 Yard shot effectively. Whatever you do, don't get locked into the idea that you can only have one, or that only one is the solution for all. Just like shoes there are the ones that you use for church, and the ones that you use for work, the ones that you use for running, and the ones that you use for hiking. They are all different for a reason. So choose wisely and get the best tool for the job. Then get another one that fits the other job better when you can. Because no one likes the Subaru Baja anyway.

THE PERFECT CAMPING FLASHLIGHT I JUST PUT ON A MASSIVE DISCOUNT SEE NOW^^^
Step By Step of why you need a gun in

my personal gun and other alternatives
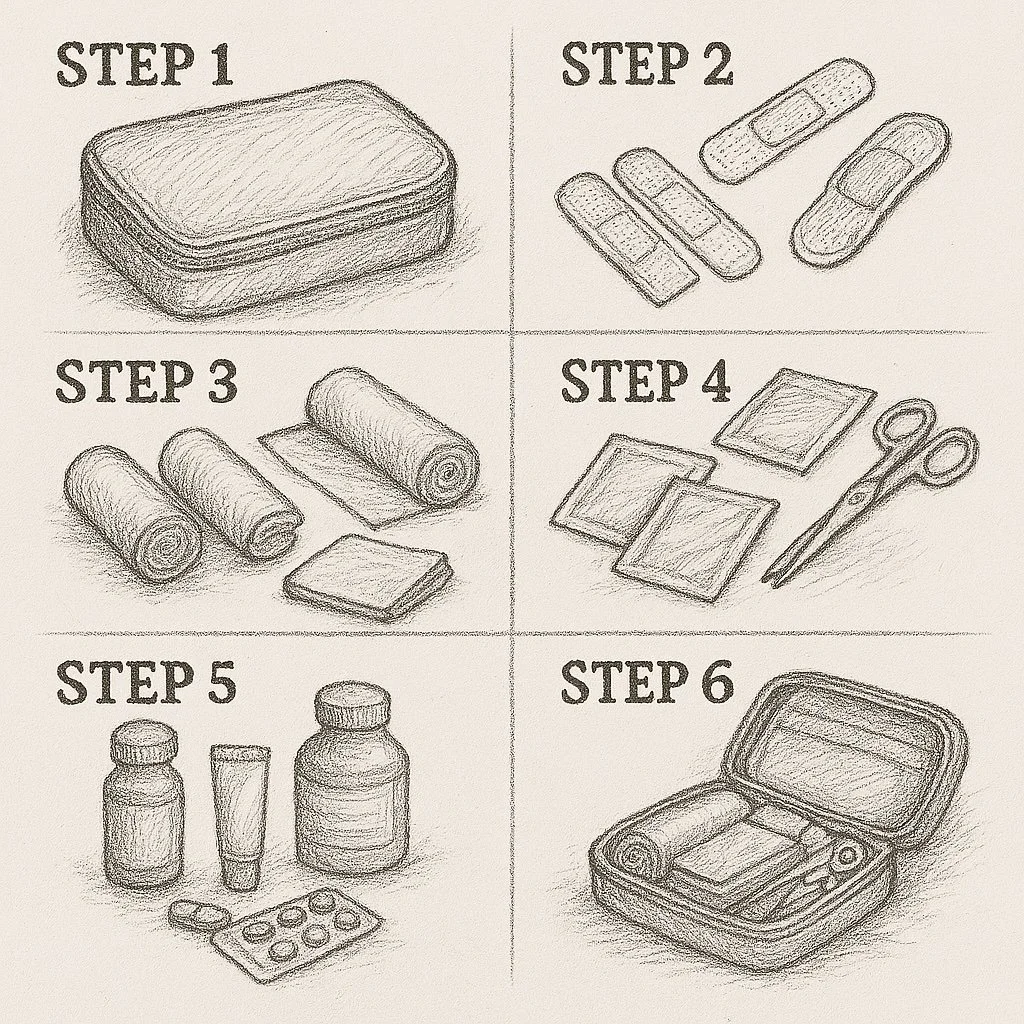
Day 18: What to put in a small medkit…
Watch. Learn. Evolve.

Medical Kits: Medical kits, they can be daunting and overwhelming. You can also get a hand by buying a pre-created medical kit that was thrown together by someone who has no idea what they're doing. When it comes to medical kids I like them to be purpose-oriented. I like them to fit the vehicle and the scenario. What do I mean by this? Well you probably don't need to prepare for ankle sprains if you're always in the car. You also probably don't want to carry a c-spine neck brace if you're hiking. So it might be wise to put all of your car accident equipment in a large bag in your car with a detachable or smaller hiking appropriate medical kit that you can keep on your person. In Afghanistan we had a small medical kit that would fit on the back of our belt that had blood stopping equipment in case we got shot. When we went out we used a larger kit called an IFAK, that had more blood stopping equipment in it.Some people also kept basic personal items like really large Band-Aids, aspirin and maybe allergy medicine in these kits. Then we kept a larger bag either on a dedicated medics back pack in the squad or in the vehicle. This was for larger incidents. The vehicles themselves had a very large kit or backup supplies like IVs and heavier equipment for stabilizing people to move. This method for planning should be easy to replicate in your home. If you have small children, Band-Aids are great. If you have bigger adults, Band-Aids are kind of worthless and just take up space. I do however like large knee skinning Band-Aids for kids and adults because if an adult actually needs a Band-Aid they are cut pretty bad. So when creating a kit like this, try to think of the mechanism of injury or what injuries might be caused while driving, hiking, farming, whatever, and make your medical kit fit that need. Try to think of the things that might happen while hiking and put that in your hiking kit. Try to think of long-term medication and stabilizing tools and keep that big kit in your house. In the end nothing beats education.

if you don’t have time to make the perfect survival medkit don’t worry…
I did it for you see now to claim your medkit for a hug deal.(Click above)
Step By Step of what you need in medkit
my own survival medkit Instruction Video
Day 17: Bugging out to do or not to do…
Turn pain to purpose.

Bugging Out: To Do or Not to Do?
The debate around bugging out often stems from confusion—people use the same term to mean different things. So, first, define it.
In the military, a bug out bag (BOB) was built to sustain us until resupply—ammo, med gear, batteries, comms, food, water, and mission-critical info. That version isn't ideal for civilian life, but it's a solid foundation.
For civilian prepping, use reverse planning:
Start with the worst-case but still probable scenario in your area—natural or man-made—and build backward.
For example, in Utah, an earthquake would likely cut travel, comms, and access to credit. Prep with:
Overland-capable vehicle
Cash
Firearm and ammo
Alternative comms (SAT/hams)
Flexible shelter/stay-or-go plan
A worst-case man-made disaster (EMP, war, collapse) requires similar prep. You’ll need to decide: stay or go?
And if you’re going, leave early and be fully ready—no last-minute packing.
A civilian BOB should include:
Cash
Ammo
Med kit
Batteries
Laminated info (locations, contacts, passwords)
Physical road maps
Bottom line: Plan for the worst, and you’ll be ready for everything else.
how to bug out step by step

If your off grid you need this tactical flashlight (click above to see deal)

bug out Instruction Video…
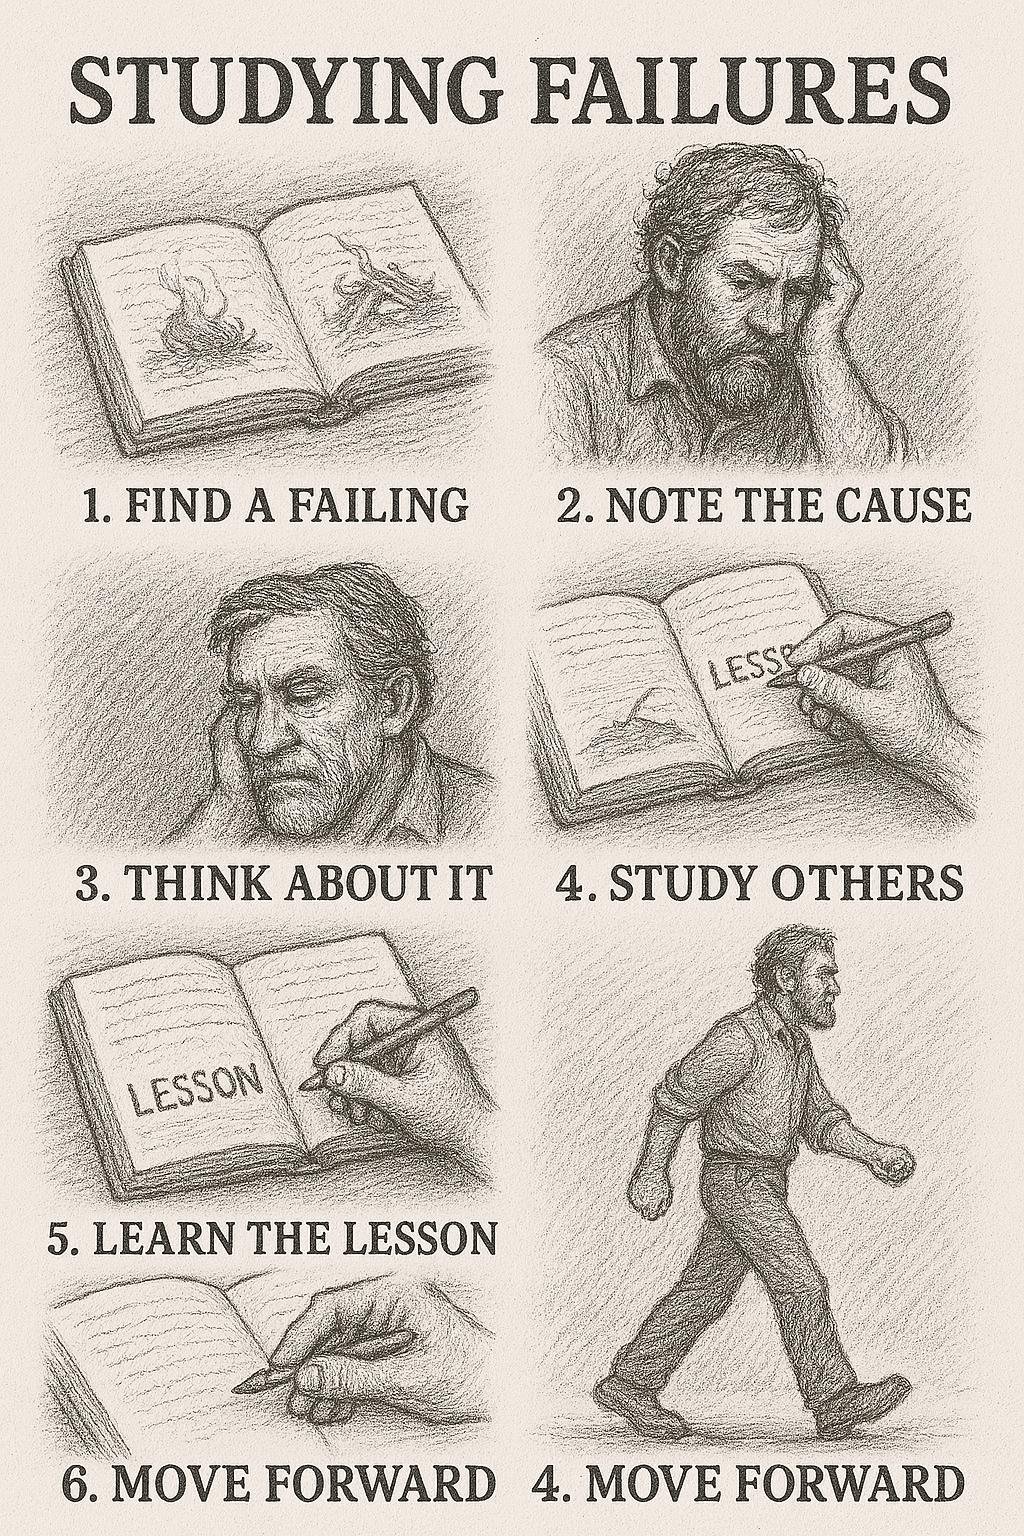
Day 16: How to learn lessons from failures…
Patience breeds power.

Lessons learned from the failures of others: In the military we have this thing called an after action review. Simply stated we do a movement or an event and then we talk about it when we are done. We ask a couple of really simple questions. What was supposed to happen, what actually happened, what did we do well, and finally what can we improve? Then we go out and train again until we get it right. This method allows us to see things that we are blind to. This method teaches us how to learn from our failures. I believe this can be applied to survival situations in mass and over history. I also believe that this can be used in our modern day from recent events to teach us about new threats. One example that I picked up from a book I read long ago is survival techniques and tactics of the Jewish people. No matter what your beliefs are, political or otherwise of the Jewish people they are a group of survivors. One of the main reasons they have had the capacity to endure genocides, displacement, Wars and violence is their ability to pick up and move somewhere else. Most catastrophes are Geographic in nature. the Potato Famine, Wars, earthquakes, they are all Geographic in nature. My ancestors survived the Potato Famine specifically because they went to another continent. People in recent years out of Jasper British Columbia survived a massive fire because they got in their cars and went somewhere else. Just recently people in West Virginia survived massive flooding because they also grabbed the RV and went north. Conversely, we can learn a ton from people moving back into austere environments like Ukraine. In this video one thing that I picked up that I have since used is to always have a power source for my communication devices and to always carry protein rich food as opposed to carbohydrate High food. This is something I kind of knew but didn't proactively do until this interview.

A lesson i learned is you need to keep yourself dry…
This does that for me (Grab yours above)
learning from failures step by step
lessons learned from ukraine (Video)…
Day 15: How to make a jungle tripod…
Bold not broken.
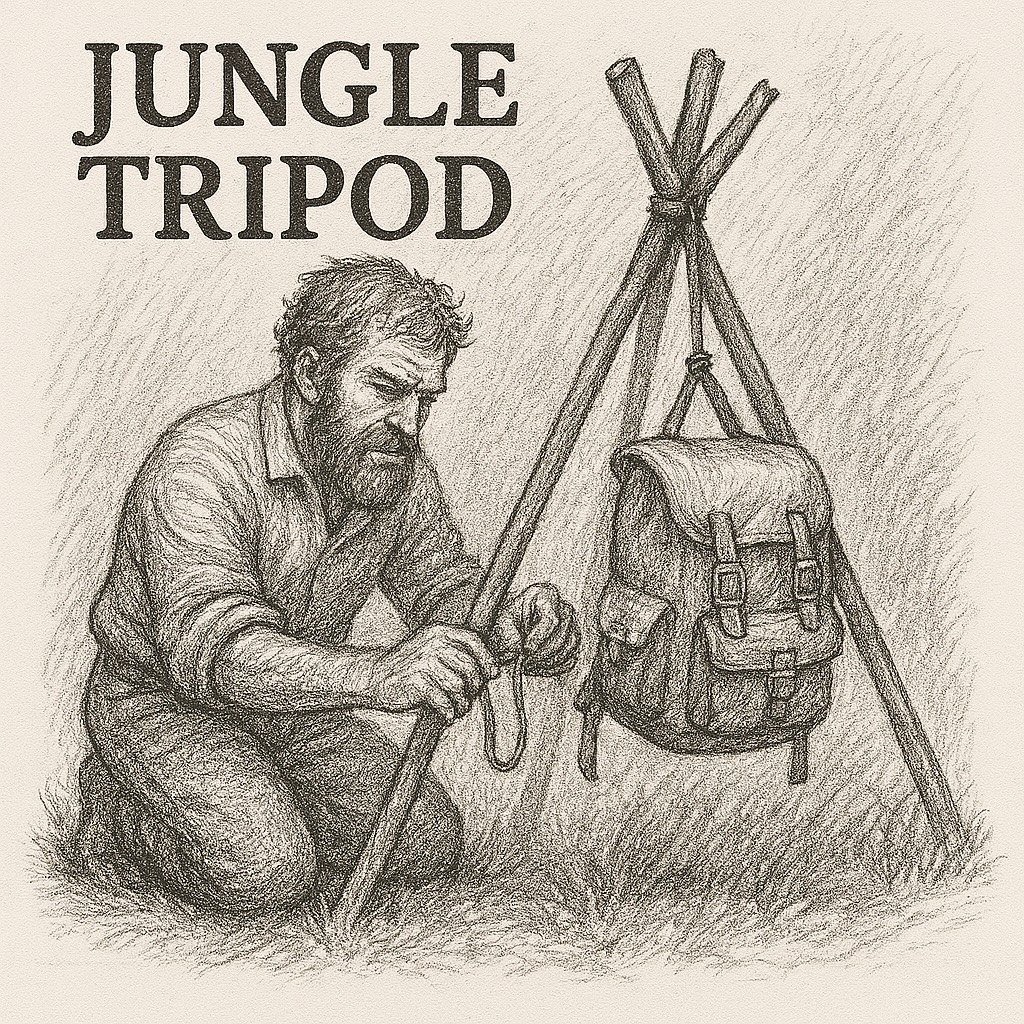
What is Primitive really: Primitive what really is it? Most people in our modern-day shun and look down on people who live primitively. The irony is this, if we were left in their environment without technology we would be the children, we would be the ones needing help, we would be the primitive. Primitive technology just means First Technology, it doesn't mean less than technology. Even going back only 10,000 years the people that lived then, were genetically exactly the same as the people that live now. The only difference being access to information. In reality Society has sadly forgotten more than it currently knows. The more I look into archaeological reconstruction, and the more I learn about primitive technology, the more I realize how brilliant it actually was. While spending time in the Columbian jungle I learned really quickly the things that I thought I knew and the things that I did not know. I was there with people who lived in the jungle that could run circles around me without shoes, could navigate without a compass, could eat without fire, cook without a lighter drink without risk of sickness and just live in that environment without any external technology. I was truly the helpless child in their environment. How is all of this relevant to survival? well if you play the what if game long enough you eventually realize that you cannot function without tools unless you use what already exists in the environment that you're in. The only way you can do that is to study techniques of the people who lived there before you and replicate them. Remember primitive technology being First Technology might be the ultimate survival technology. If it's good enough for your ancestors it’s good enough for you.

making a jungle tripod step by step

making a jungle tripod Instruction Video…
Day 14: How to make natural rope…
Action beats intention.

Making natural cordage: It's hard to put yourself in the mind of someone who lives primitively. especially when we forget that primitive technology just means First Technology not necessarily less than technology. Having spent a little bit of time in the jungle with people that were alive prior to First Contact, what they value and what they don't value is of extreme interest to me. A few years ago I had the privilege of spending time with some of the monkey Hunters and native tribes of Brazil. They valued machetes, shorts, cigarettes cooking pots, fire creation tools like the bic and rope. A lot of that makes sense to me automatically and intrinsically. The Rope however was something that caught me off guard. I watched them in awe as they cut down palm trees and created rope faster than a machine using their toes and their hands. They however cherished the role of black rope that we gave to them because it was Stronger than anything that they could make, and we had a lot of it. Rope or cordage is often an overlooked tool that is used to bind things, haft arrows, create traps, repair packs, and do so many other things that come up when you're in a survival situation. Having the ability to create rope from scratch is something that should not be overlooked. There is however a catch, you need the right kind of plant to make rope worth having. It can't just be created from any fiber. In my area of the world Dog Bane Yucca and a couple other plants are my go-to's when creating natural cordage. Natural cordage is extremely valuable with a bow drill, a Paiute Deadfall, other traps like the Mojave Scissor snare and things like an Apache match which is a bundle of juniper bark that holds fire for transport. Even the act of creating a fire smudge out of sagebrush with a natural rope that can be burnt is of value. Learning the reverse wrap, and applying it with natural cordage or even using the bottom of a cut-off T shirt to make rope can be the difference between having a tool that you need in a survival situation and going without. So check out this video and go try this for yourself.

I just made this 2 inch tactical flashlight…
and i’m giving it to you for free i have limited stock so hurry (click above)
making natural rope Step By Step

making natural rope Instruction Video…
Day 13: Using a signal mirror when lost…
Discomfort sparks growth.

Using a signal mirror when you get lost: Using a signal mirror seems straightforward. It however is not. The reason being is that it is hard to control what direction the reflection goes. There are a couple of different ways and techniques that can be reliably used to control what that light beam hits. One of them is a hologram that comes in dedicated signal mirror kits. Basically you put the mirror in front of your eye, aim the mirror at the Sun and look for the Hologram then put the hologram on the thing you want to flash. This only works with a dedicated signal mirror devices. If you aren't lucky enough to have a tool specific to the task, you can use anything shiny. When this is the case, which is more often than not, all you have to do is hold the shiny object in your right hand with it up next to your right eye then extend your left hand with your fingers in a shooter V. Shine the light on the back of your hand then put your target inside the shooter V and Flash the light up and down, thus hitting your target. This could be a Fun thing to try with friends or family while you have a radio or cell phone connection. This way you can verify that your Technique works. Go out and try it but mostly just go out.
Step By Step signal mirror use…


I DESIGNED A MEDICAL GO BAG THAT I BELIEVE EVERY SKILLED SURVIVALIST SHOULD HAVE…
I’m giving it to you for a discount simply because I want more people to be prepared grab yours (click above)
using a signal mirror Instruction Video…
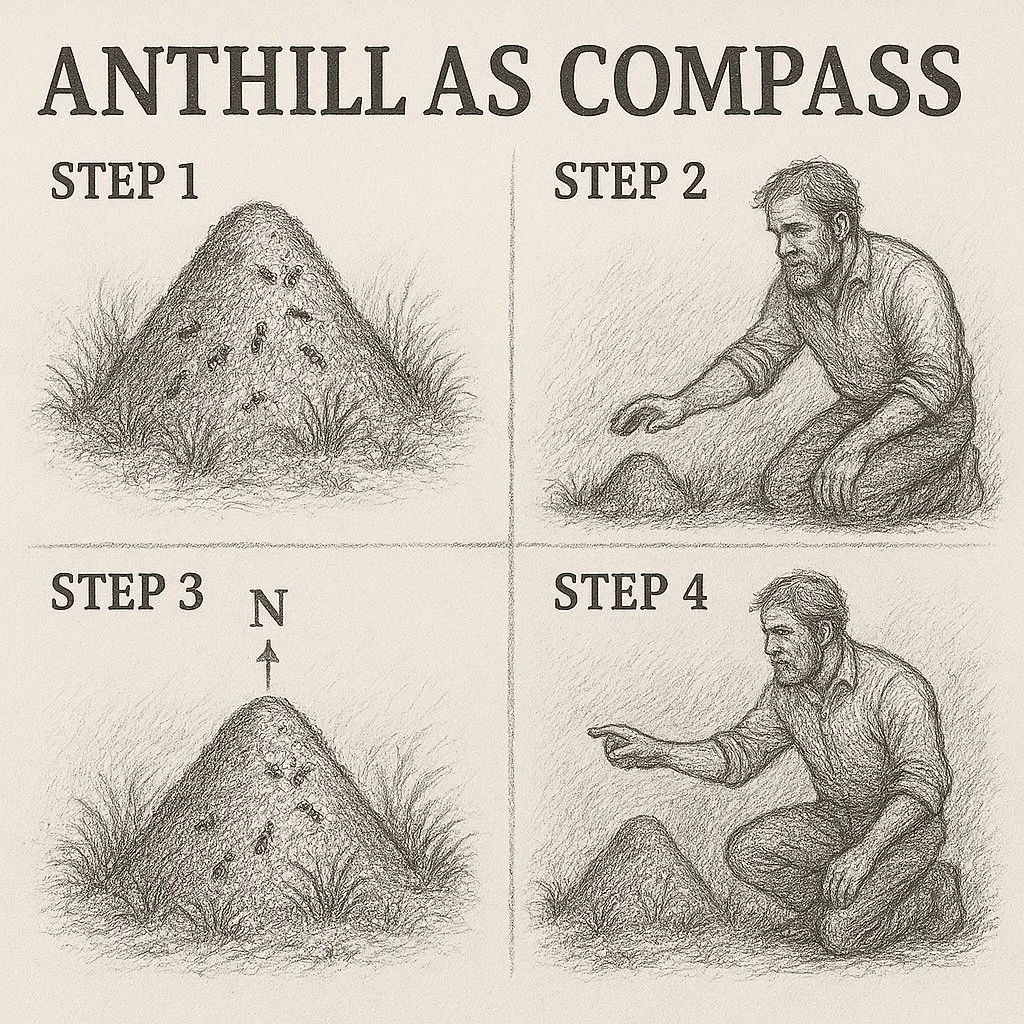
Day 12: Using a anthill as a compass…
Stay the course.

Finding north with an ant pile: Finding North with an ant pile can seem like a little bit of voodoo magic. I can assure you however it is all science. Oftentimes the things we don't understand seem like voodoo when in reality a little bit of knowledge turns Voodoo into something simple and understandable. Most animals adapt automatically to their environment over time. The fire ants of the South Western United States are no different. We all know that the sun rises in the east and sets in the West, distributing heat all day long into the late evening. In the morning it is the coldest part of the day, so you want your door to get as much heat into your home as possible. In the evening however it has been hot all day, and you want your door to get the least amount of sunlight possible to keep it cool inside. If we take into account the prevailing winds from the west to east and the temperature changes that happen affecting these winds in the morning and the evenings, then the most ideal position for your door entry on an ant hill is facing somewhere between South and Southeast. As long as the ant pile has not been run over by a car, or stepped on by something or the ant pile was not created in close proximity to a cliff wall or tree, then the absolute majority of these holes will be on the south Southeast side of the ant pile. With that in mind, while traveling in the desert if you take the average direction of all of the ant mound doorways you will see that they usually point somewhere South, Southeast. So why does this matter? Well if I have hiked into an area and I'm smart enough to know that I started from the south and moved North, then I find myself turned around and Confused in a Slot Canyon or lost in trees or otherwise lost somehow, I can then start taking an average of the direction of the and pile holes in order to figure out where South East it, which tells me where North is. When this happens, now all I have to do is head in the general direction from whence I came.
Step By Step finding north with anthill card…

Here is a flashlight I made that I believe every survivalist should have…
I put it on a massive discount so i could put it in more peoples hands grab now (click above)
finding north with anthill Instruction Video…
Day 11: Using the sun as a compass…
Keep moving forward.

Finding north with just the sun: As a child of the '80s MacGyver was one of my heroes. This man could make an atomic bomb with nothing more than a shoelace, a paperclip, a rubber bouncy ball, and some gum from the bottom of his shoe. As an adult I realize how unrealistic all of that show was. However there was an amazing information based self-reliance that MacGyver lived by that I admire to this day. Now that I'm in my mid-40s having had many decades on this planet and many Wilderness/Adventure trips under my belt I'm still in awe of people that can get by on knowledge alone. One of my favorite sayings from Mors Kochanski, a seasoned veteran instructor of the Canadian Boreal Forest, is that “knowledge weighs nothing.” Having spent time as a soldier in foreign countries and austere environments like Afghanistan, I've spent a lot of time thinking about how I can survive if I'm stripped of everything by a foreign adversary. The only answer can ever be knowledge. it's something that no one can take away from you. it's something that you don't accidentally leave at home or in your car console when you go on a hike. No matter how much of it you have it still weighs nothing. So having skillsets, like the ability to find True North with just the Sun is something I find extremely valuable. Here is the kicker though these kinds of skill sets are geographical in nature. They work differently at different altitudes and in different latitudes. They also work differently in different environments. This for example is so because in Utah I can use a fire ant hill that has not been Disturbed that is out in the open and look for the entrance hole which will almost always be in one quarter of the circle around Southeast. As I walk in comparison to multiple ant hills I get an average which gives me a general north. In the jungle there are no fire ants and it is often impossible to see the sun and in Antarctica the sun just spins in a circle in summer and goes away altogether in winter. Oftentimes we are lost for want of a general direction. If all I need is a general direction then I can head back in the general correct direction that I came from until I find a road or stream or something to handrail back to my home. So seek out knowledge from people who have actually done the thing you want to learn, because it weighs nothing and no one can take it away from you.
Step By Step finding north with stick card…

if your a skilled survivalist and you don’t have this MEDICAL GO-BAG…
You could be at risk in the wild grab this for a massive discount above

finding north with sun Instruction Video…
Day 10: How animal poop can save lives…
Progress, not perfection.


$2500 WORTH OF MY TOOLS IM GIVING AWAY FOR FREE QUALIFY ABOVE (CLICK IMAGE)
Cow and Deer Poop can save your life!: Going out into our environment and seeing things different can be a key survival strategy. Primitive living skills education can turn Wilderness items from bushes and rocks into Food, Fire, Water, Shelter, Fuel and tools. With this understanding I urge you to look at herbivore poop differently. Growing up In my Southeastern Idaho childhood home we had big vast swaths of prairie and grassland, with nothing growing on them except sparsely populated grasses. This means big spaces where you can’t make a fire for want of wood. What did the natives who lived there before us use? We also had a ton of deer, elk, and a lot of cattle all over the place. They left little turds everywhere. Herbivores are grass processing machines. They take all of that green grass, turn it into fuel for themselves and poop everywhere. After a season or two all of that poop is just sunbaked, highly compressed and very dry ground up plant material. Once you understand the science or the nature behind this topic you look at it differently. Yes, poop is gross, it can however save your life. One dried cow turd will give you the ability to transport an ember from one location to another all the way across the desert for days in the middle of nowhere. One Ember in a cow turd can revive an otherwise dead fire with a fire nest. So your challenge is to go out and learn about your natural environment so that you can see it differently, see it with different eyes and see it for what it really is. This skill set will change a barren environment into a cornucopia of tools for survival.
Step By Step animal dung card…

cow pie Instruction Video…
Day 9: Using sage brush…
Fear not.

Sagebrush: For anyone that has spent any time out west they know the entire country is covered with sagebrush. What they don't know is how to use it and what it is good for. Many people when they go into the backcountry think it is okay to stop showering and stink. You can only really get away with this for about 3 days. Then bacteria and yeast start to grow and stuff gets stanky. Native Americans routinely used the smoke from Sagebrush to kill this bacteria. At face value this seems unclean when in reality bacteria and yeast make you dirty not dirt. So if you have a technique to kill bacteria and yeast you have a technique to be and feel clean. Sagebrush being an antimicrobial and antibacterial plant is perfect for this application and it’s everywhere. With this in mind it is also an excellent minty fresh feeling toilet paper replacement plant. That one little tidbit of information might be the difference between life and death someday after you have bad tacos and no toilet paper. Once you start to learn more about the medicinal purposes of plants you tend to look at the outdoors in a different way. You start seeing things that you can eat, things that you can use to clean yourself with, things that you can make fire with and things that you can make shelter with instead of just a bunch of bushes. check out this video for more
Step By Step sage brush card…


YOU READ RIGHT I’M GIVING YOU THIS 2 INCH TACTICAL FLASHLIGHT FOR FREE READ MORE (CLICK IMAGE)
sage brush Instruction Video…
Day 8: Creating THE FIRE Piston…
His eyes were like fire.

The Fire Piston: Another not very well known primitive technique is the fire piston. For those of you that understand how a diesel engine works without a spark plug in essence, if you take all of the heat in a large space and instantly put it into a small space it can create a spark. Put some char cloth in that space when the spark goes off and you have a coal, then transfer it to a nest add O2, and you have fire. With the fire piston it is also all about technique. I have a little Mantra that I like to use called hit, pause, pull. This technique keeps the char cloth under pressure for just enough time to allow the spark to take hold and not so much time that it suffocates the flame.

Umbrellas don’t cut it in the wild…
Grab the Blak Poncho above for less than 10 bucks.(click above)
Step By Step Fire Piston Card…

FIRE PISTON Instruction Video…
Day 7: Creating THE FIRE BUNDLE…
build a man a fire, he'll be warm for a day

The fire next or fire bundle: The fire nest for the fire bundle is the magical Junction that happens after spark flame Tinder and before kindling and fuel in the fire making process. Knowing how to make a good fire nest can be the difference between creating a fire and having the fire burn out. A good fire Nest is also key to restarting a fire at 2:00 in the morning after it has gone out. A good fire nest can be placed on a cold and covered in sticks and will in about 15 minutes reignite a dead fire. A good fire nest is integral to creating any Flame after you do a bow drill, hand drill flint and steel or most other more primitive type Fire Starting methods. so learning how to create a quality fire nest separates the men from the boys and the girls from the women. check out this video for more.

If you can’t make fire you at least need light
Grab the Blak Lantern above (click image)
Step By Step Fire Bundle Creating Card…

Creating A Fire Bundle Instruction Video…
Day 6: USING fLINT AND STEEL
He is a consuming fire.

Flint and Steel: Flint and steel often confused with the Ferro rod. Flint and steel is essentially how your great-grandparents made fire before matches were invented. The key to flint and steel isn't necessarily the ability to throw a spark using a rock and some hardened metal but knowing what to throw it on. Making char cloth is the real magical secret to flint and steel fire starting. Char cloth is essentially plant-based material cooked without oxygen. This is how we make coal and most people are familiar with that.
One way that I like to do it is to get an Altoids can throw a rolled up piece of pure cotton Levi's or cotton shirt into the can and cook it in the fire until the little flame that squirts out of the side goes away letting you know that it is done. A little note here it has to be cotton, it cannot be mixed cotton or have any plastic or nylon in it otherwise the nylon/plastic will melt and bind with the cotton and it won't take a spark. After you have cooked the cotton, use a stick to slide it out of the fire and don't immediately open it or that will introduce oxygen and start burning it the rest of the way. Once it is cold to the touch you can put a little bit of the char cloth on the top and bottom of the place where your left hand holds the rock while you use your right hand to generate a spark, assuming you are right handed. When you do this, if the spark goes up or down it will catch on the char cloth which you immediately transfer to nesting material. If it was good enough for Grandma it is good enough for you.

Here is a flashlight I made so every survivalist could have it…
i’m giving it to you for FREE so I could put it in more peoples hands grab now (click above)
Step By Step Flint And SteEL Fire Creation Card…

Flint & Steel Fire Creation Instruction Video…
Day 5: Using The ferro rod
Fear not.

Ferro Rod: The Ferro Rod is truly a space age material. Not to be confused with flint and steel. Flint and steel is literally a piece of hardened Rock and Ferrous or iron. In that technique you scrape iron off with a hardened rock or Flint and it oxidizes in the air creating a spark. The Ferro rod is ferro cerium and iron that oxidizes and creates sparks at a substantially higher temperature than just iron alone. The Ferro Rod creates a huge cascade of sparks making it much easier to start fire with than just flint and Steel. Often times your Ferro kit will come with magnesium on one side and Ferro cerium on the other side. As is often the case with the very familiar Walmart or boy scout kits. When this happens you scrape a pile of magnesium into your Tinder then ignite it with the Ferro Rod. The key here is technique. Everyone wants to use the knife hand to throw Sparks at the material they are trying to start on fire. when in reality it is easier to pull the Ferro Rod backwards and let the knife hand stay in the same place so that the location of your Sparks is predictable. That way you can move the knife hand on top of your petroleum and Vaseline or pile of magnesium or fluffed up cambium layer of the Cottonwood tree or whatever you are trying to start on fire and predictably put the spark where you want it. This technique is great for introducing children to the backcountry and Bushcraft techniques. check out this video for more
Step By Step Ferro Rod Instruction Card…


vests are nice…
Heated, Tactical vests are better…
GRAB YOURS ABOVE
Ferro Rod Video Instruction…
Day 4: Creating A Bow Drill Fire
Who the Son sets free, is free.


EVERY SURVIVALIST NEEDS A MEDKIT…
I MADE ONE THAT YOU SHOULD TRAVEL ON THE GO WITH…
GRAB YOURS ABOVE.
Bow Drills: Bow drills at first seem like an insurmountable task. But with patience and practice they can reliably start fires every single time. Bow drills have the best mechanical advantage of all of the friction fire sets. My personal favorite is the Egyptian bow drill method. The reason it is so effective is because it works great with 550 cord, shoelaces, and modern string that everyone wears on their person at all times in the form of the bottom of a shirt, or shoelaces, or purse strings. The Egyptian bow drill set consists of five items: string, a bow that is kind of straight, a spindle that is as straight as possible, a socket and a hearth board.
To make an Egyptian set you find a greenstick about thumb width, preferably something springy like willow. I like to fire Harden My bow later on after the first fire has been created. To make the bow you skin the bark off of your bow stick then there are many ways that you can add a string to a stick. I like to create a figure 8 knot and slip it over the top of the stick then create a divot at the bottom of the stick where your hand rides and wrap it a bunch of times then Tuck the string inside of it. This gives me the ability to quickly adjust the tension for each different sized spindle as the string stretches.
Next you create a similar diameter spindle from an extremely dry and mostly straight stick. I like to say you can cut a banana straight to give the best visual on how to do this. Don't be afraid of taking a lot of material off of the spindle because it has to be straight. When it rolls on your Hearth Board, it needs to roll like a marble across a clean floor.
Next you make the Hearth board, the Hearth board is basically a 2x4 shaped board, about the thickness of your spindle. Lastly you need a socket on top of your spindle. This can be many things. I really like to use the brass bowl-shaped divot inside of my knife as a spindle socket. You can however use a little chunk of wood from the upper portion of the creation of your Hearth board as a temporary socket. The key is as little friction on the socket on top and as much friction on the Health Board as possible. One way to achieve this is to put green leafy material, maybe a bug or something slick on the top between your socket and spindle. Otherwise you will find yourself busting a coal on the socket instead of the Hearth board. This is a skill that is best learned from a friend who knows how to do it in person, however once learned and repeated on your own is something no one can ever take from you. Because knowledge weighs nothing.
Step By Step Bow Drill Instruction Card…

Bow Drill Fire Creation Instruction Video…
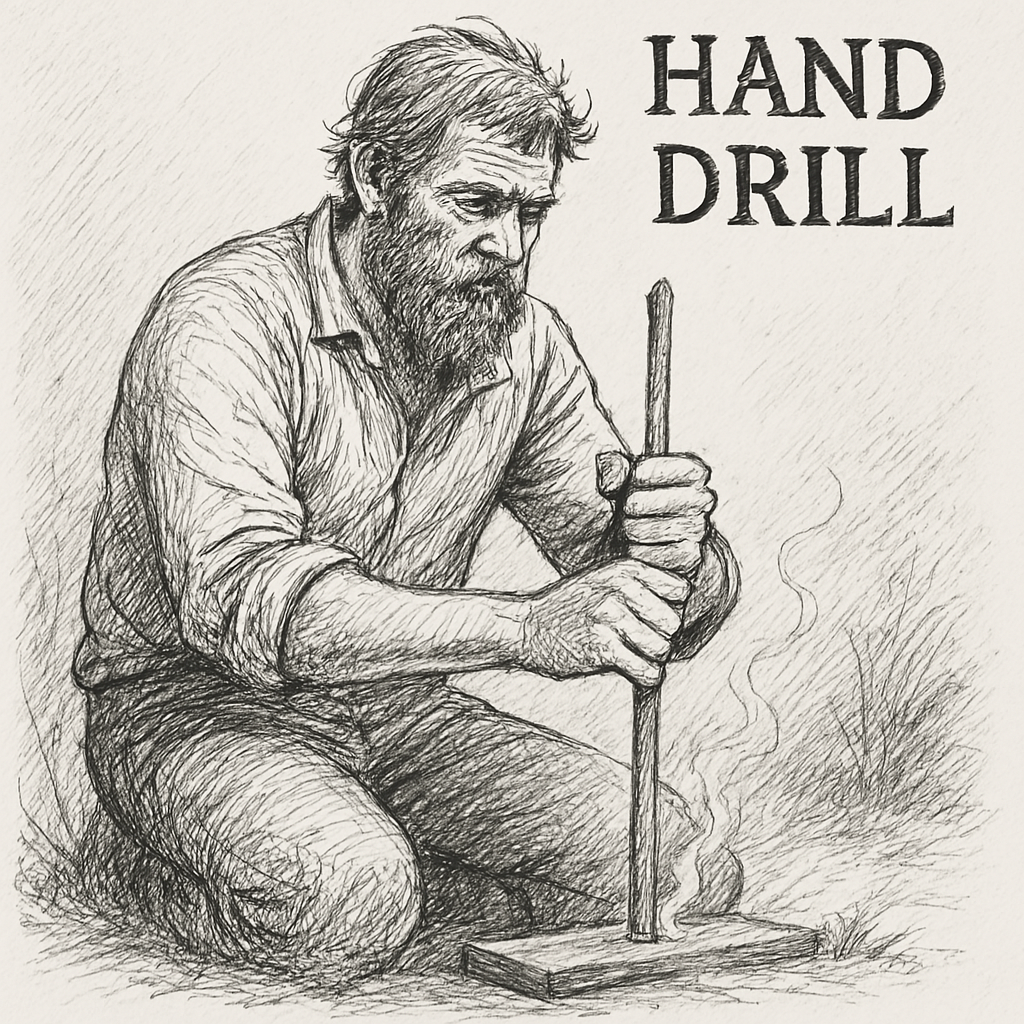
Day 3: Creating A Hand Drill Fire
Be Kind Always.
Be Kind Always.
Hand drill: Why is the hand drill the primary fire source for indigenous people the world over? simply put, with skills it's the easiest one to make. Now I realize that with skills part is really important. Having said this, let's think this one the way all the way through. If you are a nomadic tribesmen running across the plains of Africa do you want to take the time to make rope, find a perfectly shaped bow, carve a spindle and hearth board? Or do you want to break off a straight stick and drill it into a hearth board and make fire to cook tonight? Before the comment section blows up, I know I'm simplifying this in a way that is unrealistic with regard to your ability to make fire with this tool. However I also know from experience that it is easier while walking or hunting and Gathering to find two sticks of the appropriate build, and bust a coal by rubbing them together for fire. So consider this an advanced skill for when you don't have the equipment needed that can substantially broaden your ability to survive thrive wander hunt gather and just be in the backcountry without support. Add the hand drill to your skill set bring a Bic but practice this as much as possible, because every tool fails and not every situation gives you the ability to have tools to begin with. people live daily with this being their only means of Fire production. if it is good enough for them make it a tool that is good enough for you as well.
Step By Step Hand Drill Fire Instruction Card…

I HATE SLEEPING ON THE COLD FLOOR IN THE WILD…
SO I MADE A PORTABLE SURVIVAL MATTRESS GRAB YOUS ABOVE.

Hand Drill Fire Creation Instruction Video…
DAY 2: FIRE SCIENCE LAws…
Always Learn.


MY DEFENSIVE FLASHLIGHT…
I’M PUTTING ON A MASSIVE DISCOUNT GRAB YOURS ABOVE.
Fire science: Fire science, why does it even matter? Have you ever watched a Boy Scout trying to light a green tree on fire with a lighter? After a few minutes they have a black stick, a halfway full Bic lighter and no fire. I have, why doesn't it work? Well, the answer is fire science.
So let's talk a little bit about it.
What is fire? Fire is a combination of three things: Heat, oxygen and fuel. We call this the fire triangle. Kick any one leg out of the fire triangle and you do not have fire. Let's break it down a little bit more so that we can understand the nature of what we are actually seeing. Heat shouldn't be a complicated thing for people to understand. Rub your hands together really fast and you will feel Heat. The spark in your lighter is heat. When that spark is thrown into the air, it causes a chemical reaction between butane (fuel) and the oxygen in the air (O2) which gives us fire. If you have ever looked at a fire while it is burning you notice that the flame is about a quarter of an inch above the wood. What is happening here? Well the wood is being heated up by infrared radiation from the flame which is causing it to give off gas which is mixing with oxygen in the air and creating fire.
Okay okay so why does this matter? Well it matters because the main reason your fire doesn't work is because you have water inside of your fuel that is making it cold and taking out that heat part of the equation. Or you smother by leaving it on the ground which is removing the oxygen part of the equation. Or you finally got fire and decided it would be a good idea to put a stick on top of it and remove the oxygen from the fire thus killing your fire. When you understand how important oxygen is to the fire triangle you start to grasp the concept of needing a little bit of space between the bottom stick and the top stick so that the gasses leaving the bottom stick can mix with the oxygen in the air, to start a fire and heat up the top stick without you putting your fire out. In the future when you can't get your fire started, think through it logically. pick it up off the ground with a little Log Cabin. Surround the fire with gray dead standing finely processed wood that isn’t wet, then when you finally get a flame don't go and throw a stick on top of it suffocating it of oxygen.
Day 1: Understanding Survival PRIORITIES
Stay Humble.


One of the most crucial survival priorities are survival knives grab the unbelievable voyager knife for a one time deal.
Survival priorities: What exactly does this mean? Well, let me start out by introducing myself. You can call me Skip, as I won’t give my name publicly as I try to stay of grid. I am a survivalist. A real one. I get a ton of questions on what I should do if this or that happens from people that know me, few of which know my location as I move my footprint often. You see, everyone likes to play the what if game, “what if,” my plane goes down…”what if,” I forget my lighter, “what if,” I find myself naked stranded in Antarctica with nothing? Well there is a simple solution to all these questions and it is called the idea of survival priorities.
So let's talk about survival priorities. What is my primary priority? well don't die. Okay that is all well and good but how do I not die? The thing is the answer is simple, it depends. But that's not a good answer. That's not an answer you can use to apply anything of value in any of thosesituations at least not without the rule of threes.
So what is the rule of threes? The rule of Three’s is a guideline, not necessarily an actual rulethat helps you to think your way through a survival situation. It's a little bit of scientifically backed data that helps you to prioritize and figure out what really is going to kill you first and then youcan take steps to stop it. In my line of work being military and law enforcement for the past 20 years I have a Tyler's version of the rule of threes. It goes something like this.
We know that the average gunfight lasts about 3 seconds so you have about 3 seconds in an austere environment without security. Security can be a lot of things from a firearm to a blunt tool to a knife to a location in front of a law enforcement facility to an exit path maybe even aparachute. Whatever your security plan is just have one and remember, like they say stay strapped or get clapped.
The next rule is 3 minutes without air. this one confuses many people and it confused me aswell at one time. This is more of a preparation reminder rule. If you are in a float plane and your plane goes down you have about 3 minutes before you die from suffocation this means anypreps that you should have are of no value to you if they are in the fuselage while your plane isgoing down the drink. You have to have whatever you need on your person, and in your pockets. That lighter you want, that knife you need, that emergency rescue Beacon it all needsto be in your pocket or on your person.
The next rule is 3 hours without shelter in inclement weather. What does this mean? First off it means that you need to wear appropriate clothing for your environment. If you can't sit comfortably by a fire at 2:00 in the morning without dying from exposure with the clothes you have on your back, then you didn't bring enough clothes. Shelter starts with what you're wearing then goes to sleeping bags, bivy shelters and tents. Finally it hits the traditional idea of shelters being windbreaks from rocks and logs that you turn into a shelter.
The next rule of Threes is 3 days without water. Now this one I need to remind you again is just a guideline not an exact rule. you might last 4 hours in the Mojave Desert without water, you might last 4 days in the jungle without water. All this rule is designed to do is to remind you thatwater is more important than food.
The next rule is 3 weeks without food. An interesting study in Canada showed that you can go 40 days without food as long as you have vitamins and water and only about 20 days if you have roughly 500 calories per day without permanent long-term side effects. What this tells us is that it might be better to go without food and eat all of what you have when you have it than it is to nibble all the time and never go into ketosis. You can live a long time off the fat you have on you right now, so your takeaway should be that food is not the most important item, it might be the third or fourth most important item so if you're hungry work on fire water and shelter before you eat. When you eat it’s ok to binge a bit and don’t feel the need to spread it out over time. Lastly 3 months without companionship. even if you have everything you need you're eventually going to go a little bit crazy without your friends. so remember the purpose behind all of this stuff is to get yourself found then like my friend Justin always says, go home and eat tacos.